The October Soap Challenge, put on by Amy Warden of Great Cakes Soapworks, is the Wood Grain Technique. Unlike many other challenges, this one is very open in the methods you can use to get a wood grain affect.
This is my entry into the challenge:
First Batch:
Vermont Maple in wood grain textured mat with Clyde-Slide swirl:
In my first attempt at achieving a wood grain look, I used a textured mat and the Clyde Slide swirl. (For more information on these techniques, check out December 2015 Impression Mats Soap Challenge Blogs on Dec 14, 2015 & Dec 16, 2015; as well as the September 2015 Clyde Slide Swirl Soap Challenge Blog on September 18, 2015).
I did the Clyde Slide pour slightly different than in the Clyde Slide Challenge, pouring up and down the length of the mold, to try to create a wood grain effect.
I also used a new scent by Bramble Berry called Vermont Maple. Here’s the Description:
- Fresh, dripping maple & warm, rich coffee. This fragrance is comfort in a bottle. Top notes of pure maple syrup are touched with a hint of orange peel and blackberries. Middle notes of wood and fallen leaves and a base of vanilla cream coffee results in a warm and sophisticated scent. Light Acceleration, discolors light brown. (All 2 reviewers got no acceleration).
I thought I would still have enough time to do a Clyde Slide swirl, even with the note of a slight acceleration. Although Maplewood is typically a light color, I have seen it stained dark, and I wanted to go with darker colors to take advantage of the fragrance discoloring.
The Plan:
5 lb mold lined with freezer paper and wood grain textured mat. Clyde Slide swirl (fax funnel pour into bucket and then mold – back & forth over the mold), to create a wood grain look throughout the soap. Then create some knots of wood with colors and chopstick.
Use Master Batch oils #5 (Oct 10, 2016 Blog recipe), with the addition of Coffee Butter (and put through the lye calculator.)
Master Batch Oils #5: 28 oz Oils; Plus 1.5 oz Coffee Butter = 29.5 oz oils; 42 oz soap:
Oils: 28 oz/ 794 grams Master Batch Oils #5
Coffee Butter 1.5 oz/ 43 grams
Lye: 4.15 oz/ 118 grams
(1.74 oz disc) Distilled Water: 8 oz/ 227 grams
Sodium Lactate: 8 grams (into Lye liquid at 130 degrees/less)
Batter/Colors/2 oz FO (divided into all batter):
10 oz BB Cappuccino Mica
8 oz BB Burgundy mica (& touch of brown)
8 oz BB Sienna (& touch of True Red)
6 oz BB Activated Charcoal
10 oz BB Racing Stripe Orange mica (morphs to gold-yellow)
I wasn’t sure I wanted to permanently commit to using the 5 lb mold with this impression mat, so I did not cut the mat. It was the perfect length of the mold, with the sides curving up a bit without cutting them separately – which I thought would add to a wood-like look:

Wood grain impression mat.

5 lb mold with wood grain mat.
My lye-water was 95 degrees and my oils were 105 degrees when I mixed them together. I stick blended to emulsified, divided the batter and mixed in my colors:

Colors in batter: (clockwise) Sienna, Racing Stripe Orange, Activated Charcoal, Cappuccino, & Burgundy
I added equal amounts of fragrance to each color, with a little extra to the brown. No acceleration at first; when it felt like the brown was starting to stiffen up a tiny bit (it was still very thin), I rested my bowl at a slight incline and I started my faux funnel pour down the opposite wall from where I would pour out the batter. I did smaller wall pours than in the past, to try to get more of a wood grain/layered effect and alternated some of my colors at random, as I had more brown & orange/yellow and less black.

Soap in a Faux funnel pour in bowl, ready to go into the mold.
I poured a single layer of soap; knowing it would make about 7 bars; added some knots on what would be the bottom of each bar, so that there was a nice design on both sides:

Soap in mold, with added knots in wood.

Close up of knots in wood. Top, just center of right, you can see some wood grain of colors.
I wrapped the mold in towels to gel and put it to bed for 20 hours.
The Un-molding:

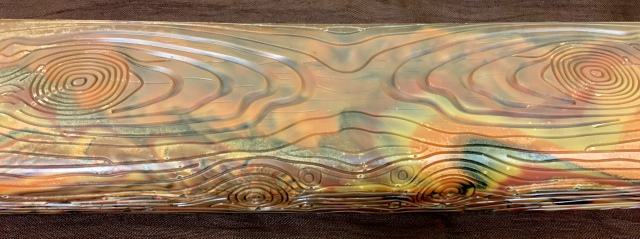
Closer view
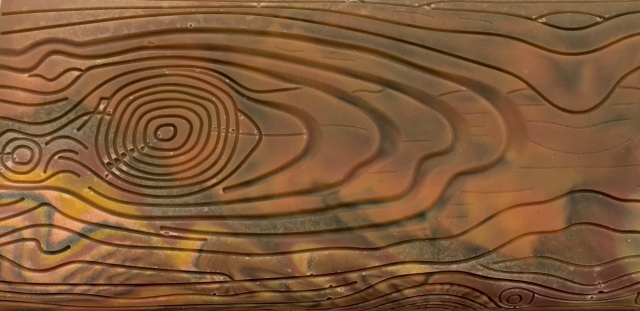
Close up – check out the intricate shades & color patterns.
I did not want to cut this soap. (Steve thought it looked like a real piece of wood.) Each time the light hit the loaf, it changed the color and detail of the patterns in the soap:


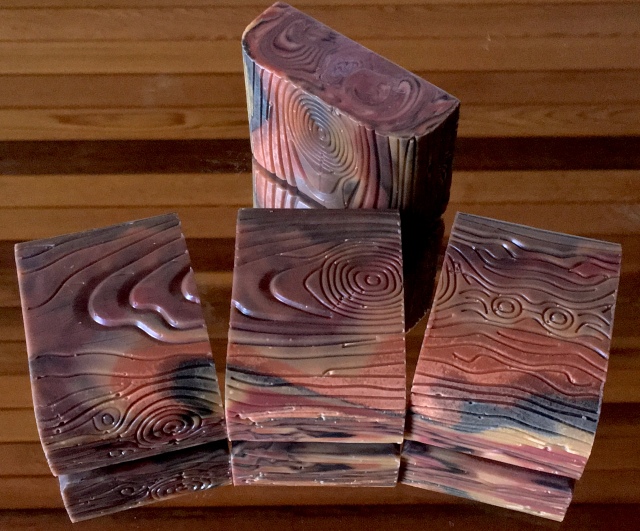
The Cut:
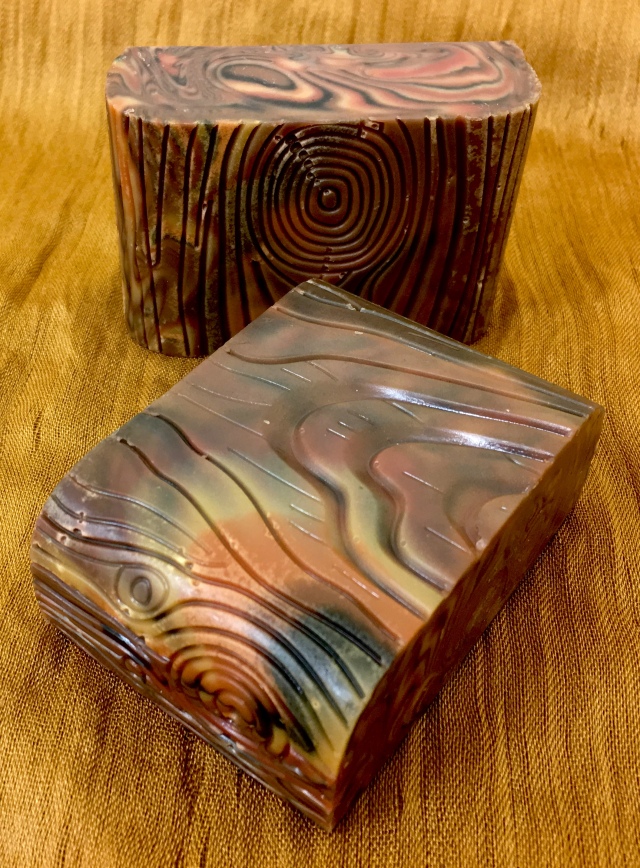


Photographed on top of a mirror, with a reflection of the cedar ceiling:

Even the edges that do not have the mat impression on them, have a nice wood grain effect:


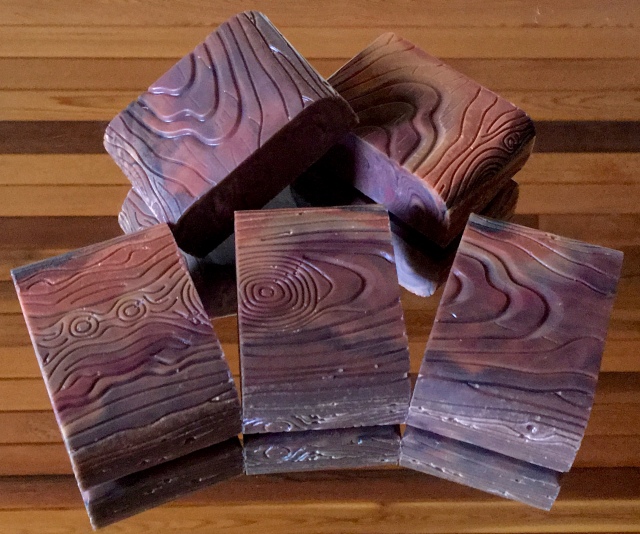
Photo submitted to soap challenge.
Second Batch:
Red Cedar & Amber – Squirt Bottle Technique?
For this attempt, I wanted to try the squirt bottle technique that Amy demonstrated in her video tutorial. And another new fragrance by Bramble Berry – Cedar and Amber. Here’s the description:
- This invigorating scent is everything Fall was meant to be! It opens with rich pine notes blended with warm cinnamon and clove. A hearty base of cedarwood is mellowed with a gentle amber scent. No A or R. Discolors to light tan.
We are very fortunate to have a gorgeous cedar ceiling in our great room that my Sweetie Pie put in all by himself (it took 5 weeks.) It’s lightly oiled and the wood itself is a variety of shades from light to dark. With this incentive, I wanted to create some diversity of colors in this soap, with the addition of some variations of reds.
The Plan:
5 lb mold lined with freezer paper and wood-grain textured mat (put at a different angle than the first batch).
Add color and fragrance, then divide batter equally into 6 squeeze bottles. Lay down vertical lines, then chopstick vertically, with some round knots & curving around knots.
Use Master Batch oils #5 (Recipe on Oct 10, 2016 Blog), with an addition of Almond Butter (and put through the lye calculator.)
Master Batch Oils #5: 28 oz Oils; Plus 1.5 oz Almond Butter = 29.5 oz oils; 42 oz soap:
Oils: 28 oz/ 794 grams
Almond Butter: 1.5 oz/ 43 grams
Lye: 4.15 oz/ 118 grams
(1.74 oz disc) Distilled Water: 8 oz/ 227 grams
Sodium Lactate: 8 grams (into Lye liquid at 130 degrees/less)
Batter/Colors/2 oz FO:
7 oz BB Cappuccino mica
7 oz BB Burgundy mica (with a touch of True Red)
7 oz BB Merlot mica (with a touch of Purple & Red)
7 oz BB Sienna mica
7 oz BB Yellow Oxide (with a touch of gold mica)
7 oz BB Nuclear Orange, (with True Red, Sienna, & Gold Mica)
I mixed my 95 degree lye-water with 104 degree oils to just past emulsified, but not yet at thin trace, then divided it evenly into 6 containers and added colors. I added a touch of several other colors (listed above) to the main color to create the shade that I wanted (the orange & yellow I got was much more muted than this photo depicts):

Clockwise: Burgundy, Merlot, Sienna, Orange, Yellow, Cappuccino.
I was looking forward to using a scent that I didn’t have to worry about accelerating and/or discoloring (but I was sadly disappointed). I poured in my fragrance and before I was able to even think of putting them into squeeze bottles, it accelerated and got thick. I laid down lines of color as fast as I could and used my chop stick in an attempt to accentuated the grain, but instead, I got lots of air pockets that I wasn’t able to release with repeated banging of the mold.

Single layer of soap in 5 lb mold.

Close up of of part of soap in mold.
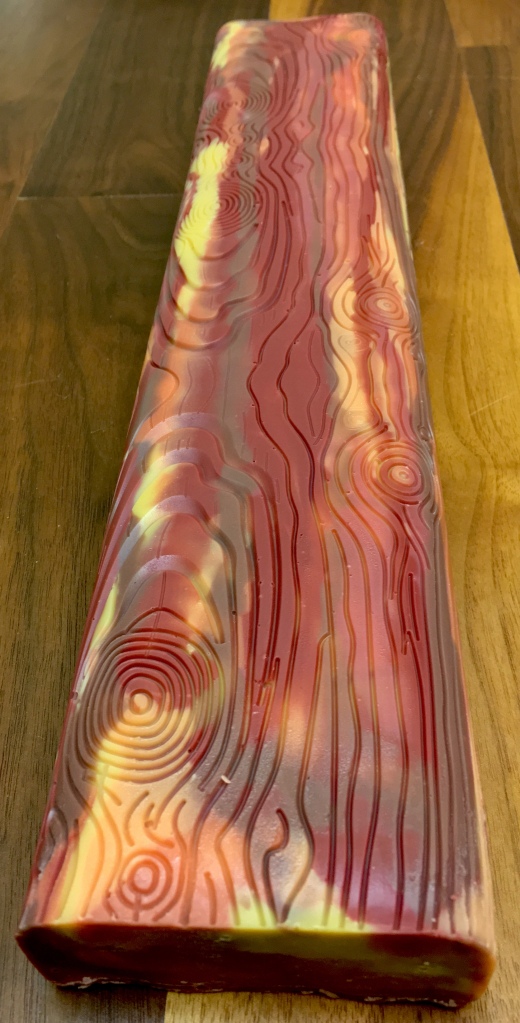
The Un-molding:
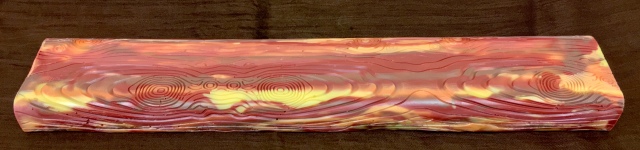

Close up.
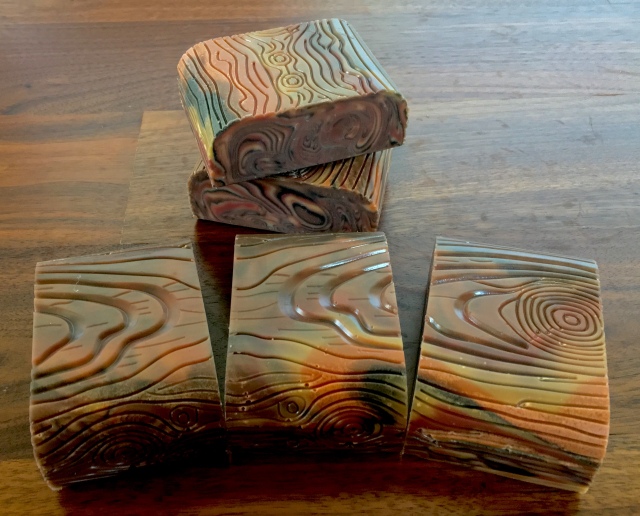
The Cut:

I like how the design of this impression mat curves over the edges of the soap, as well as the versatility of it. In the second batch, I moved the mat slightly, which gave every single bar a knot in it, as well as the wood grain.
I didn’t have the opportunity to do the squeeze bottle method; just putting down lines of color doesn’t give the soap enough of a blended look to the grain. (I hope to be able to try Amy’s technique in the future.) With the modified Clyde slide method, I was able to blend the colors in a more organic way, which feels like a truer wood grain look.
Over 225 soapers signed up for this challenge from all over the world including: Angola, Australia, Canada, Czech Republic, Germany, Guatemala, India, Mexico, Norway, Scotland, Singapore, Spain, Sweden, Switzerland, UK and US!

Gorgeous! Looks like some of the fancy woods they use to make gun stocks from. I really like your colors and your method, I bet the technique you used would make a great Camo soap as well.
LikeLike
Rhonda:
That’s such a great idea! I haven’t made a camo soap in ages…combining it with wood grain would look great too!
Thanks so much!
Sly
LikeLike
Love the rich colors you used. It turned out so well!
LikeLike
Helka:
Thank you for your kind comments – I love your soaps too!
Sly
LikeLike
Sorry if this is a double post. I really love the rich warmth of the colors you chose. It turned out so beautifully!
LikeLike
Thank you so much Helka!!
Sly
LikeLike
Love Love Love it !! Such rich colors & absolutely loved the long log. It is so realistic ! All the best to us, Sly ! 🙂
LikeLike
Priya:
Thank you so much!!
Sly
LikeLike
Both batches are lovely. I admit I am drawn to the darker, rich colors of the one you entered. 🙂 The Clyde Slide does give it a bit more interest as well. Great choice!!
LikeLike
Thank you Amy!!
It’s so fun to try new things!
Sly
LikeLike
What a great idea to use the Clyde slide with that impression mat. The end “grain” pattern is perfect!! Those dark colors in your first batch are beautiful. Nicely done!
LikeLike
Marisa:
Thank you so much – I appreciate your feedback!
Sly
LikeLike
They’re both awesome!
LikeLike
Jennifer:
Thank you so much! I’m so glad you like them.
Sly
LikeLike
Great idea with the Clyde Slide. Came out beautiful!!
LikeLike
Thanks so much Lee!!
Sly
LikeLike
both batches turned out lovely. How much fun is that impression mat, I love it!
LikeLike
Thank you Lisa!
It was much more fun to use than I would have thought – lots of depth and detail.
Sly
LikeLike
My goodness, Sly! Your soaps are beautiful and the colours are so vibrant. Loving how you incorporated the impression matt. Thank you for providing such a detailed post on your process and congrats on a wonderful soap challenge entry! 🙂
LikeLike
Belinda:
Thank you for your great feedback!
I’m so glad you like it.
Sly
LikeLike
Ah, I love all the colors you chose!!
LikeLike
Thank you so much Sara!
Sly
LikeLike
Awesome job Sly! The colors and the really close color rings for your Clyde Slyde worked perfect! Very pretty color choices, and the Fall themed scent matches great too : )
LikeLike
Thank you for your wonderful feedback Edmonds!
Sly
LikeLike
Wow, Sly! Such creativity and thought went into these and it most definitely shows! I absolutely love the idea of using the Clyde Slide for this particular technique. It gave your soap(s) a truly awesome depth. I think the rounded edges were such a unique touch, too! VERY well done, indeed!
P.S. After seeing that gorgeous ceiling it is clear you have immense talent in your family!
LikeLike
Debi O:
Thank you so much for your wonderful comments – that really mean a lot to me!
Sly
FYI: Steve is the really talented one when it comes to anything handy…he build our entire house himself, as the general contractor and working side by side with every hired hand.
LikeLike
These are both really beautiful – absolutely love your colors and how you used them with the impression mat. I think you’re right – the curve adds more elegance to an already elegant design. (And I love that new scent too!)
LikeLike
Michelle:
Thank you so much!
You are one of the few that has commented on the curve and (even noticed it).
The new scents are great! (I think Cedar & Amber cures to a nicer scent than Maple – but they are both wonderful oob.)
Sly
LikeLike
These are both gorgeous soaps, Sly! I especially love the Clyde Slide idea. Very creative with the impressions mats and colors and techniques. Great job!
LikeLike
Katy:
Thank you so much! That means a lot to me!
Sly
LikeLike
Your soaps look super, Sly! Love the colours and the curved sides!
LikeLike
Thank you Ammu! I’m so glad you like them!
Sly
LikeLike